The Baofeng UV-5R and You
A tutorial on how to use the Baofeng UV-5R to monitor conventional radio channels around you. Like at a protest.


This is mostly copy and pasted from my Twitter so it might read a little awkwardly. But at least you don’t need to scroll through a bunch of tweets. All the examples are for the Boston area but can be modified for your area pretty easily.
Before we get into the nitty-gritty a huge caveat. Never transmit on any frequency except for the ones you are authorized to transmit on. Seriously. The FCC doesn’t take kindly to it.
Boston Police and the Boston FCC Office have worked together before to track down broadcasts. The FCC has direction finding equipment. Reference.
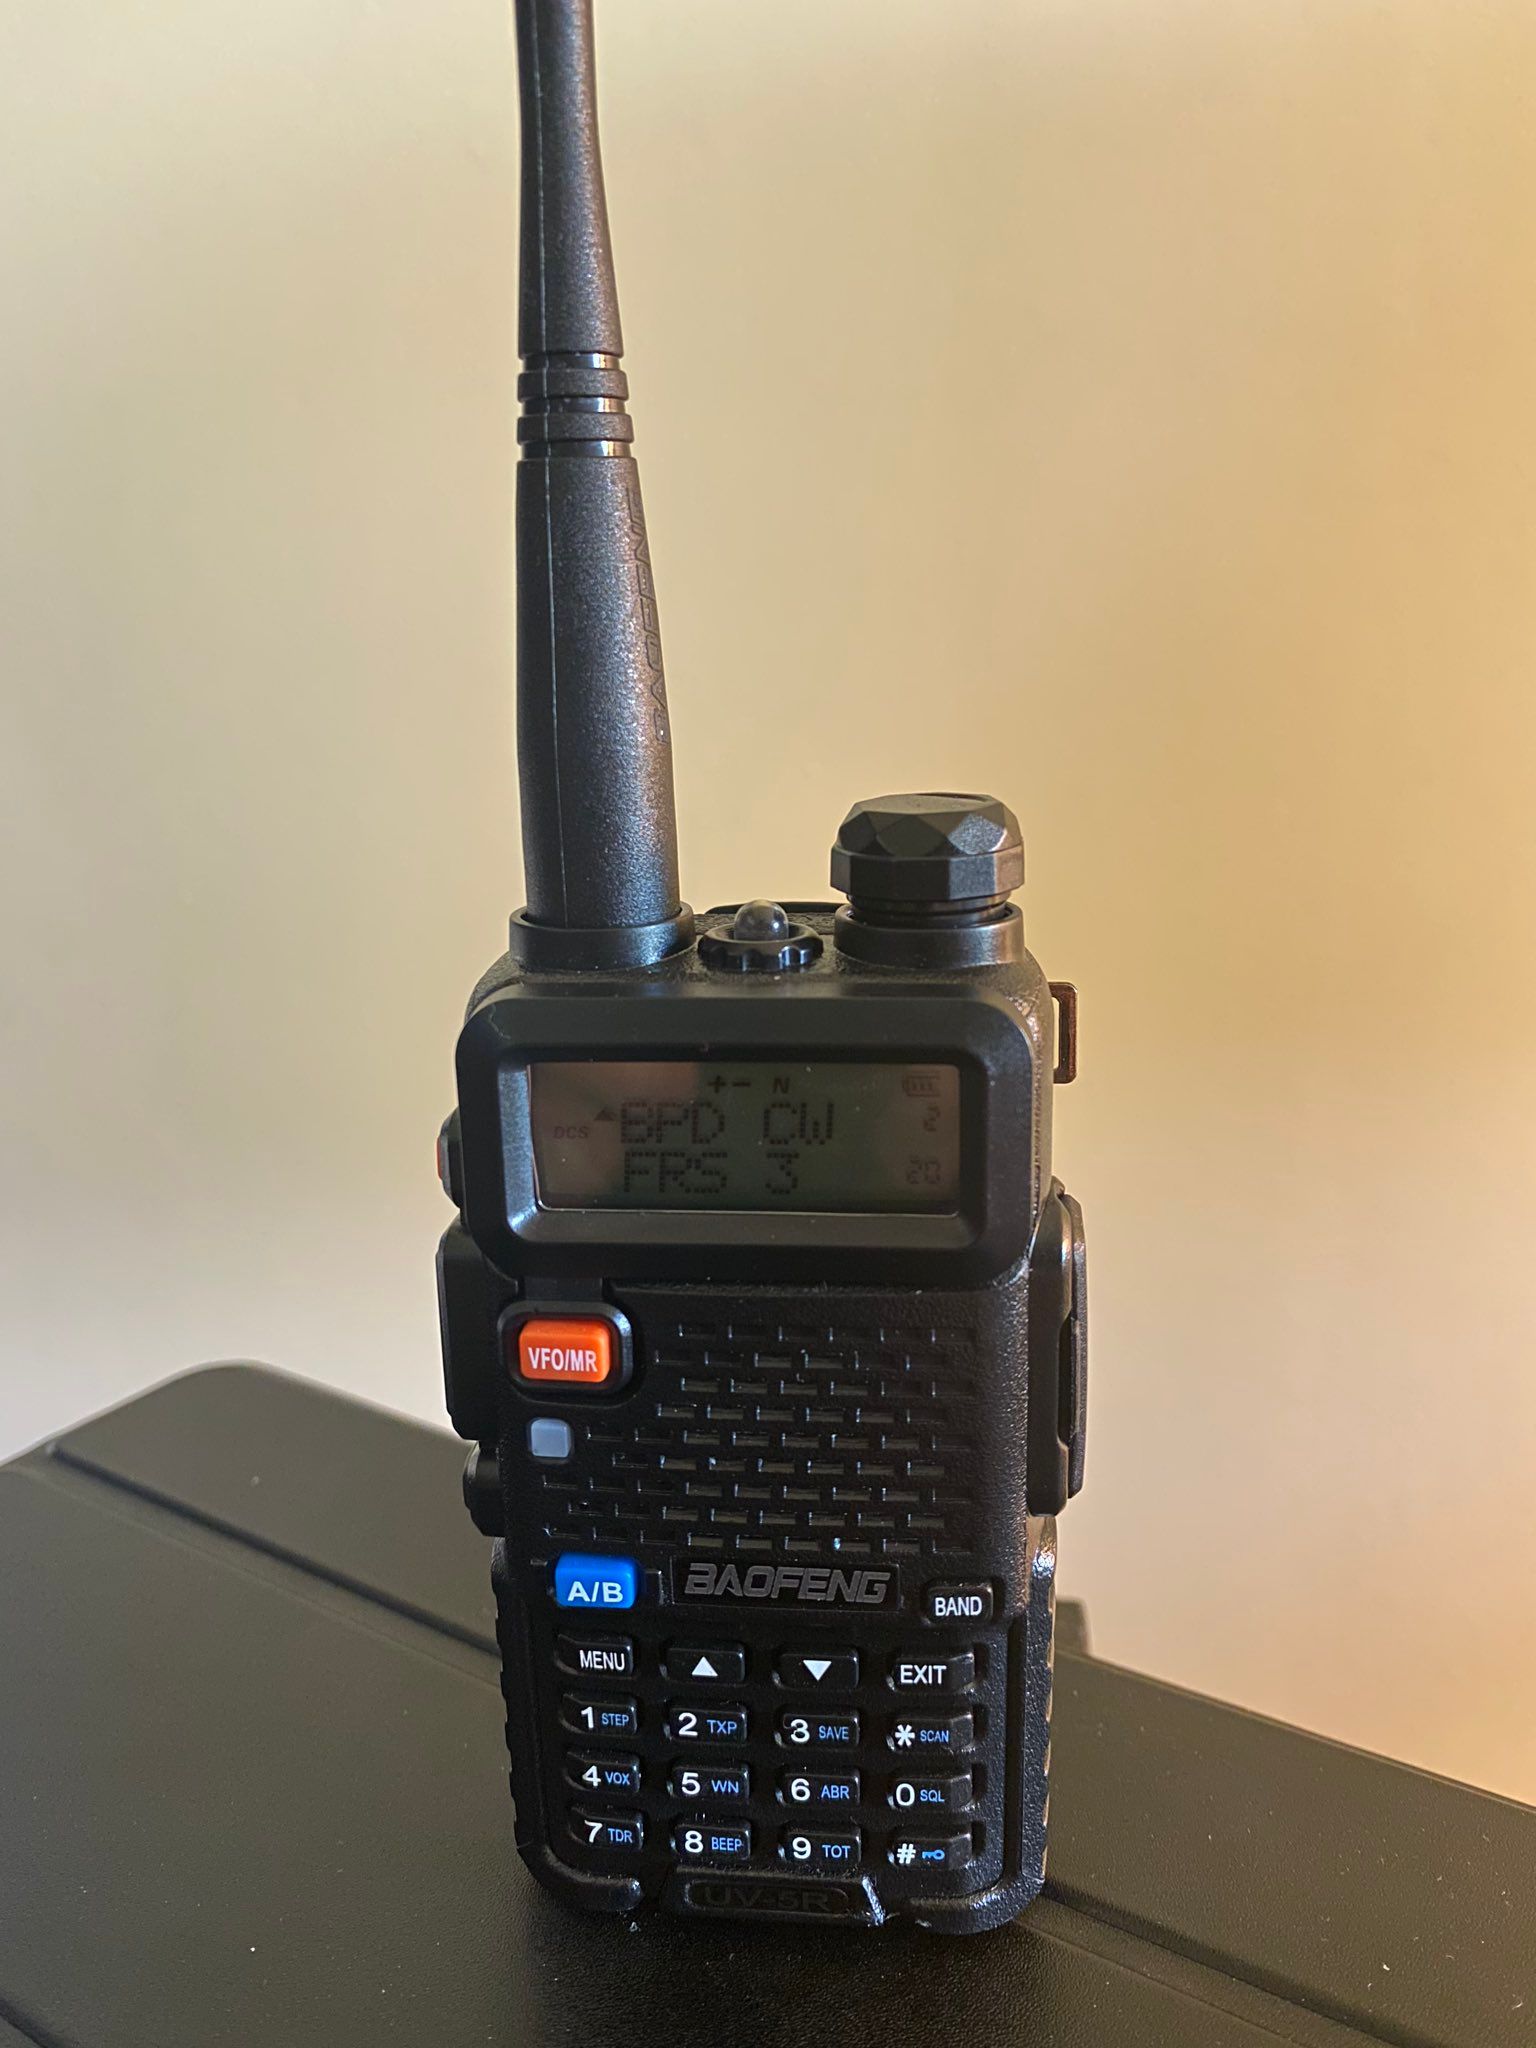
Let’s talk about the Baofeng UV-5R which is a popular and cheap two way radio. If the city/town/county you live in uses conventional (ie non digital) radios (UHF or VHF) then it can also be used as a scanner.
So you can be mobile and know what’s going on. Say, at a protest.
Before I get into how to use it a couple of caveats:
- Reiterating this again: unless you are on the FRS band (ie commercial walkie talkies) never hit the PTT/transmit button. It is illegal to transmit on any frequency other than the FRS frequencies. Update: it's technically illegal to use a UV-5R or other Part 90 device to transmit on FRS frequencies. Not sure if they enforce it but don't transmit just to be safe.
- The frequencies you are monitoring need to be analog non trunked ones in the VHF or UHF bands. For public safety VHF that’s 150–174 MHz and 450–512 MHz for UHF. If you see NAC on the Radio Reference page then it’s a P25 digital system and you can’t monitor it.
- What you hear on the radio doesn’t always equal the truth. Take everything you hear with a grain of salt.
I personally like use Radio Reference to find frequencies. It’s free and easy to use. This is the page for the US where you can dive into your local systems pretty quickly.
For reference here are the frequencies for Boston Police and what the various things in the “tones” column means. As you can see only three of them are NAC but the rest aren’t. If you see DPL, PL or CSQ in the Tone column you can most likely monitor it using the UV-5R.
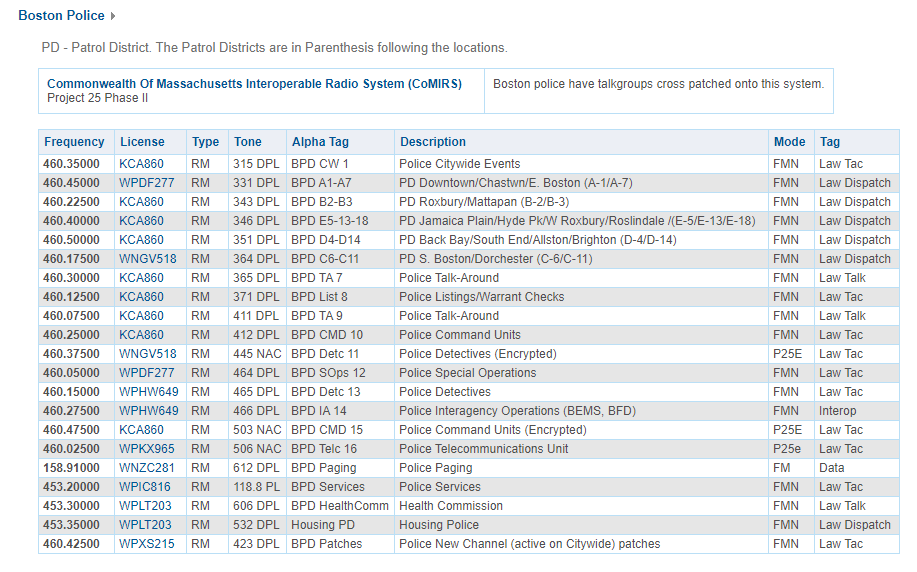
If you see numbers in the 700–900 MHz range or tones that say CC/RAN unfortunately you can’t monitor those. The 700–900 MHz range is outside the bands the UV-5R can monitor and the other two are proprietary digital systems.
Let’s use BPD A-1/A-7 as an example. Their frequency is 460.4500. So you have a frequency. Now what? Now you type it in while in frequency mode. Make sure you’re on the correct band (ie the number starts with 4 or 5) and click the band button if not. Then type it in.
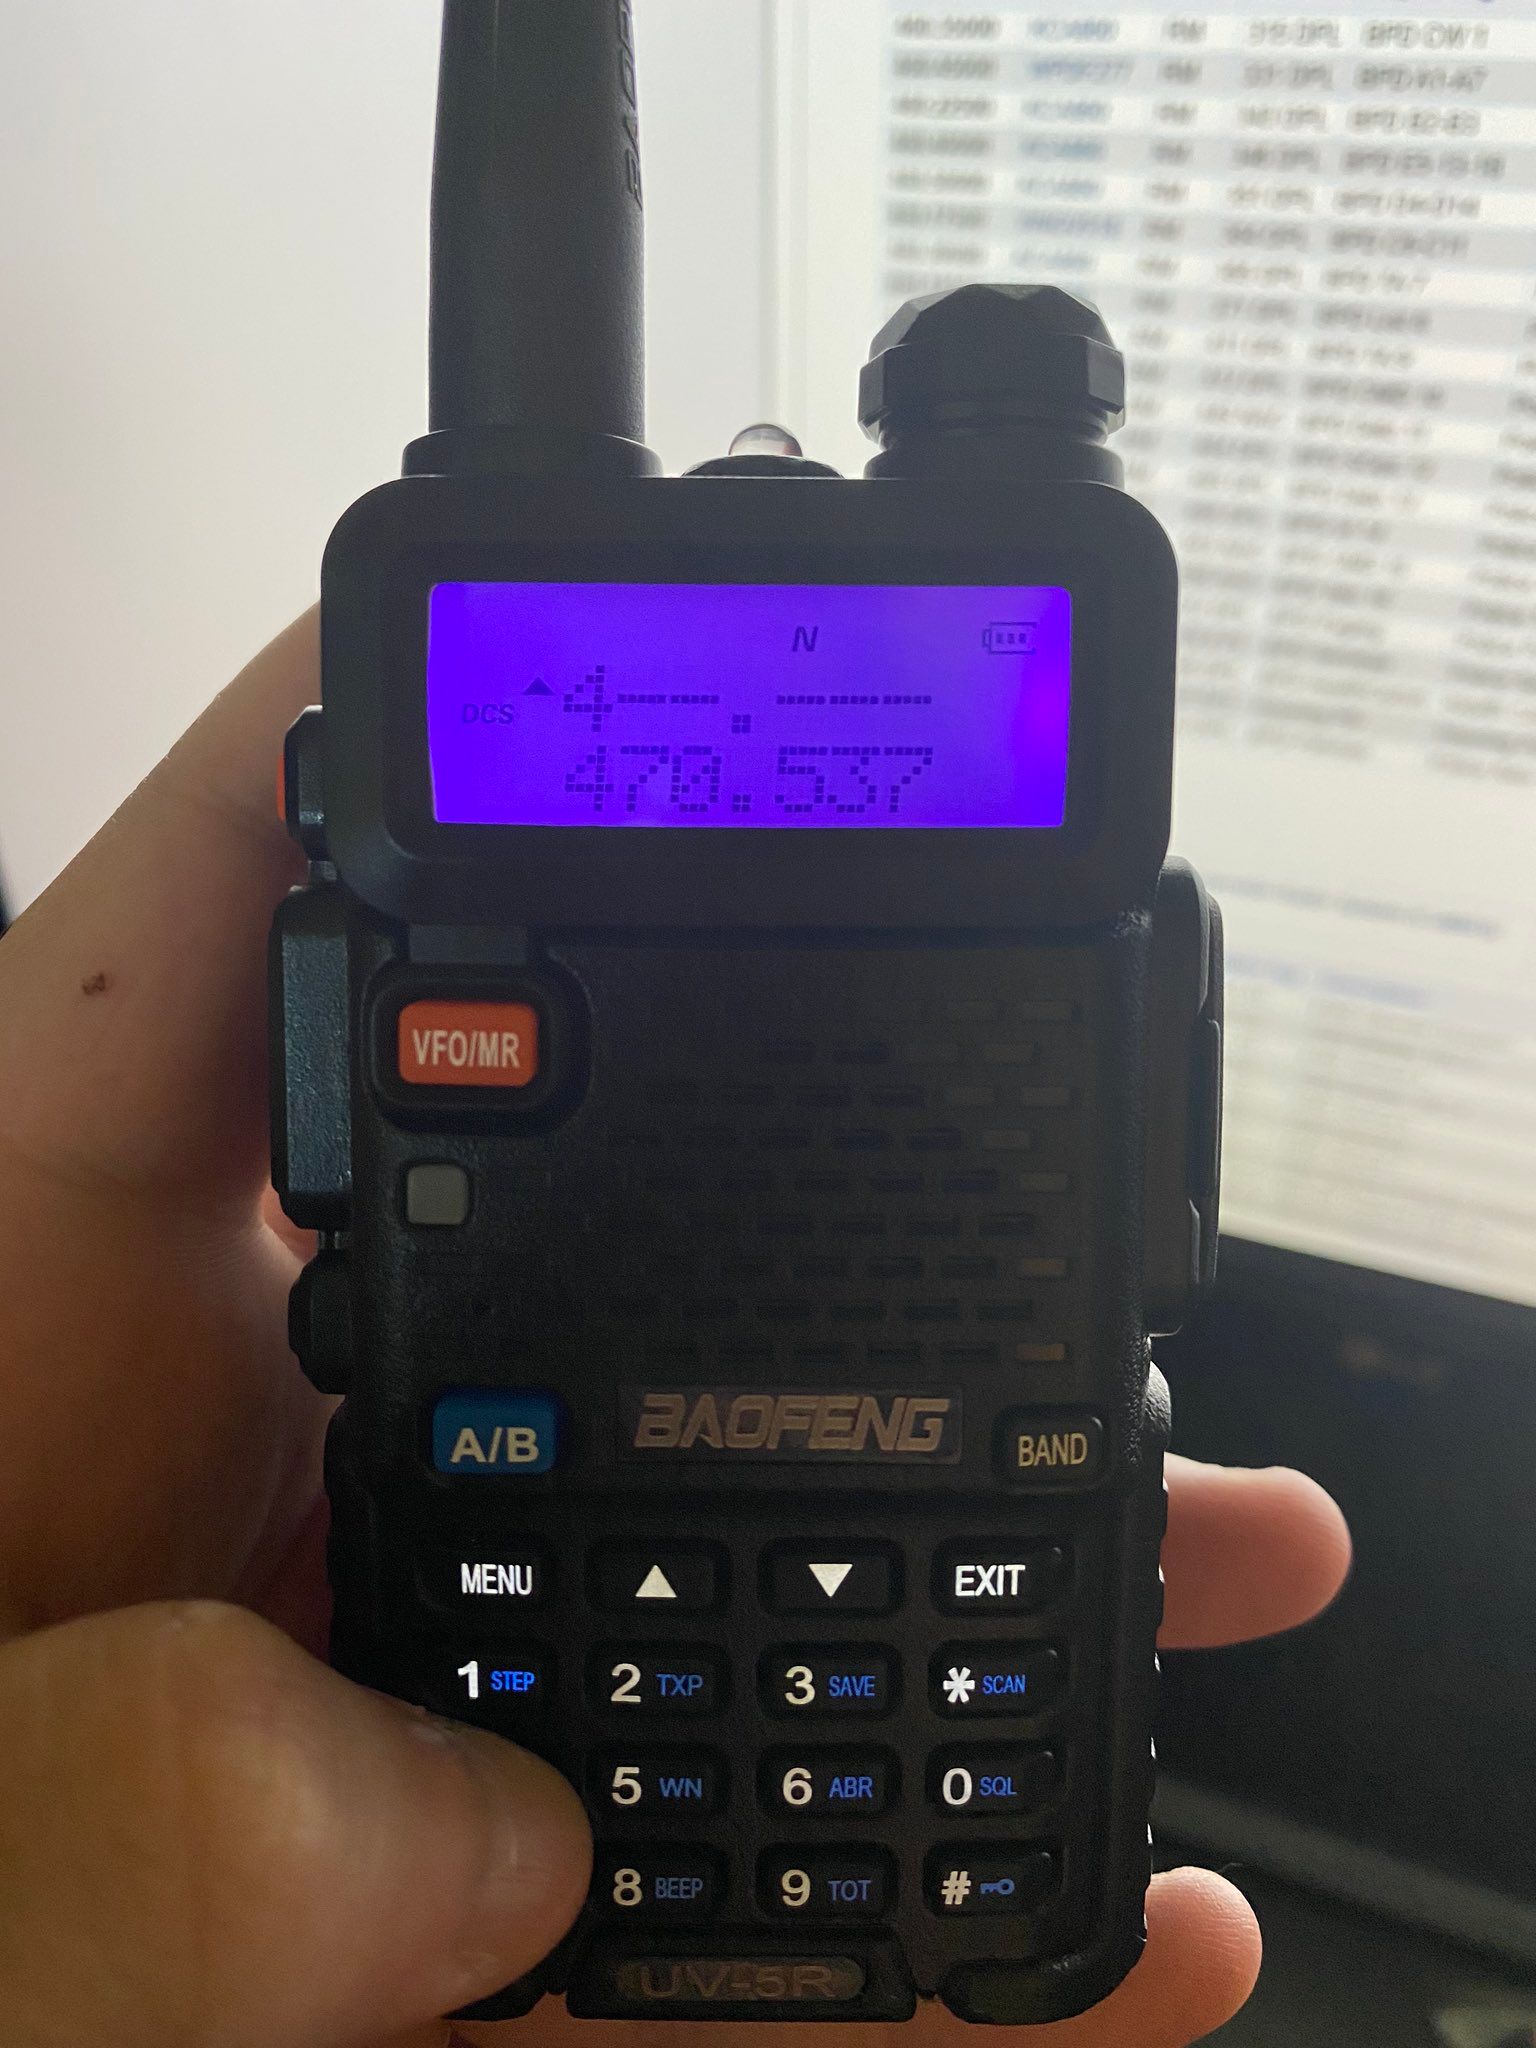
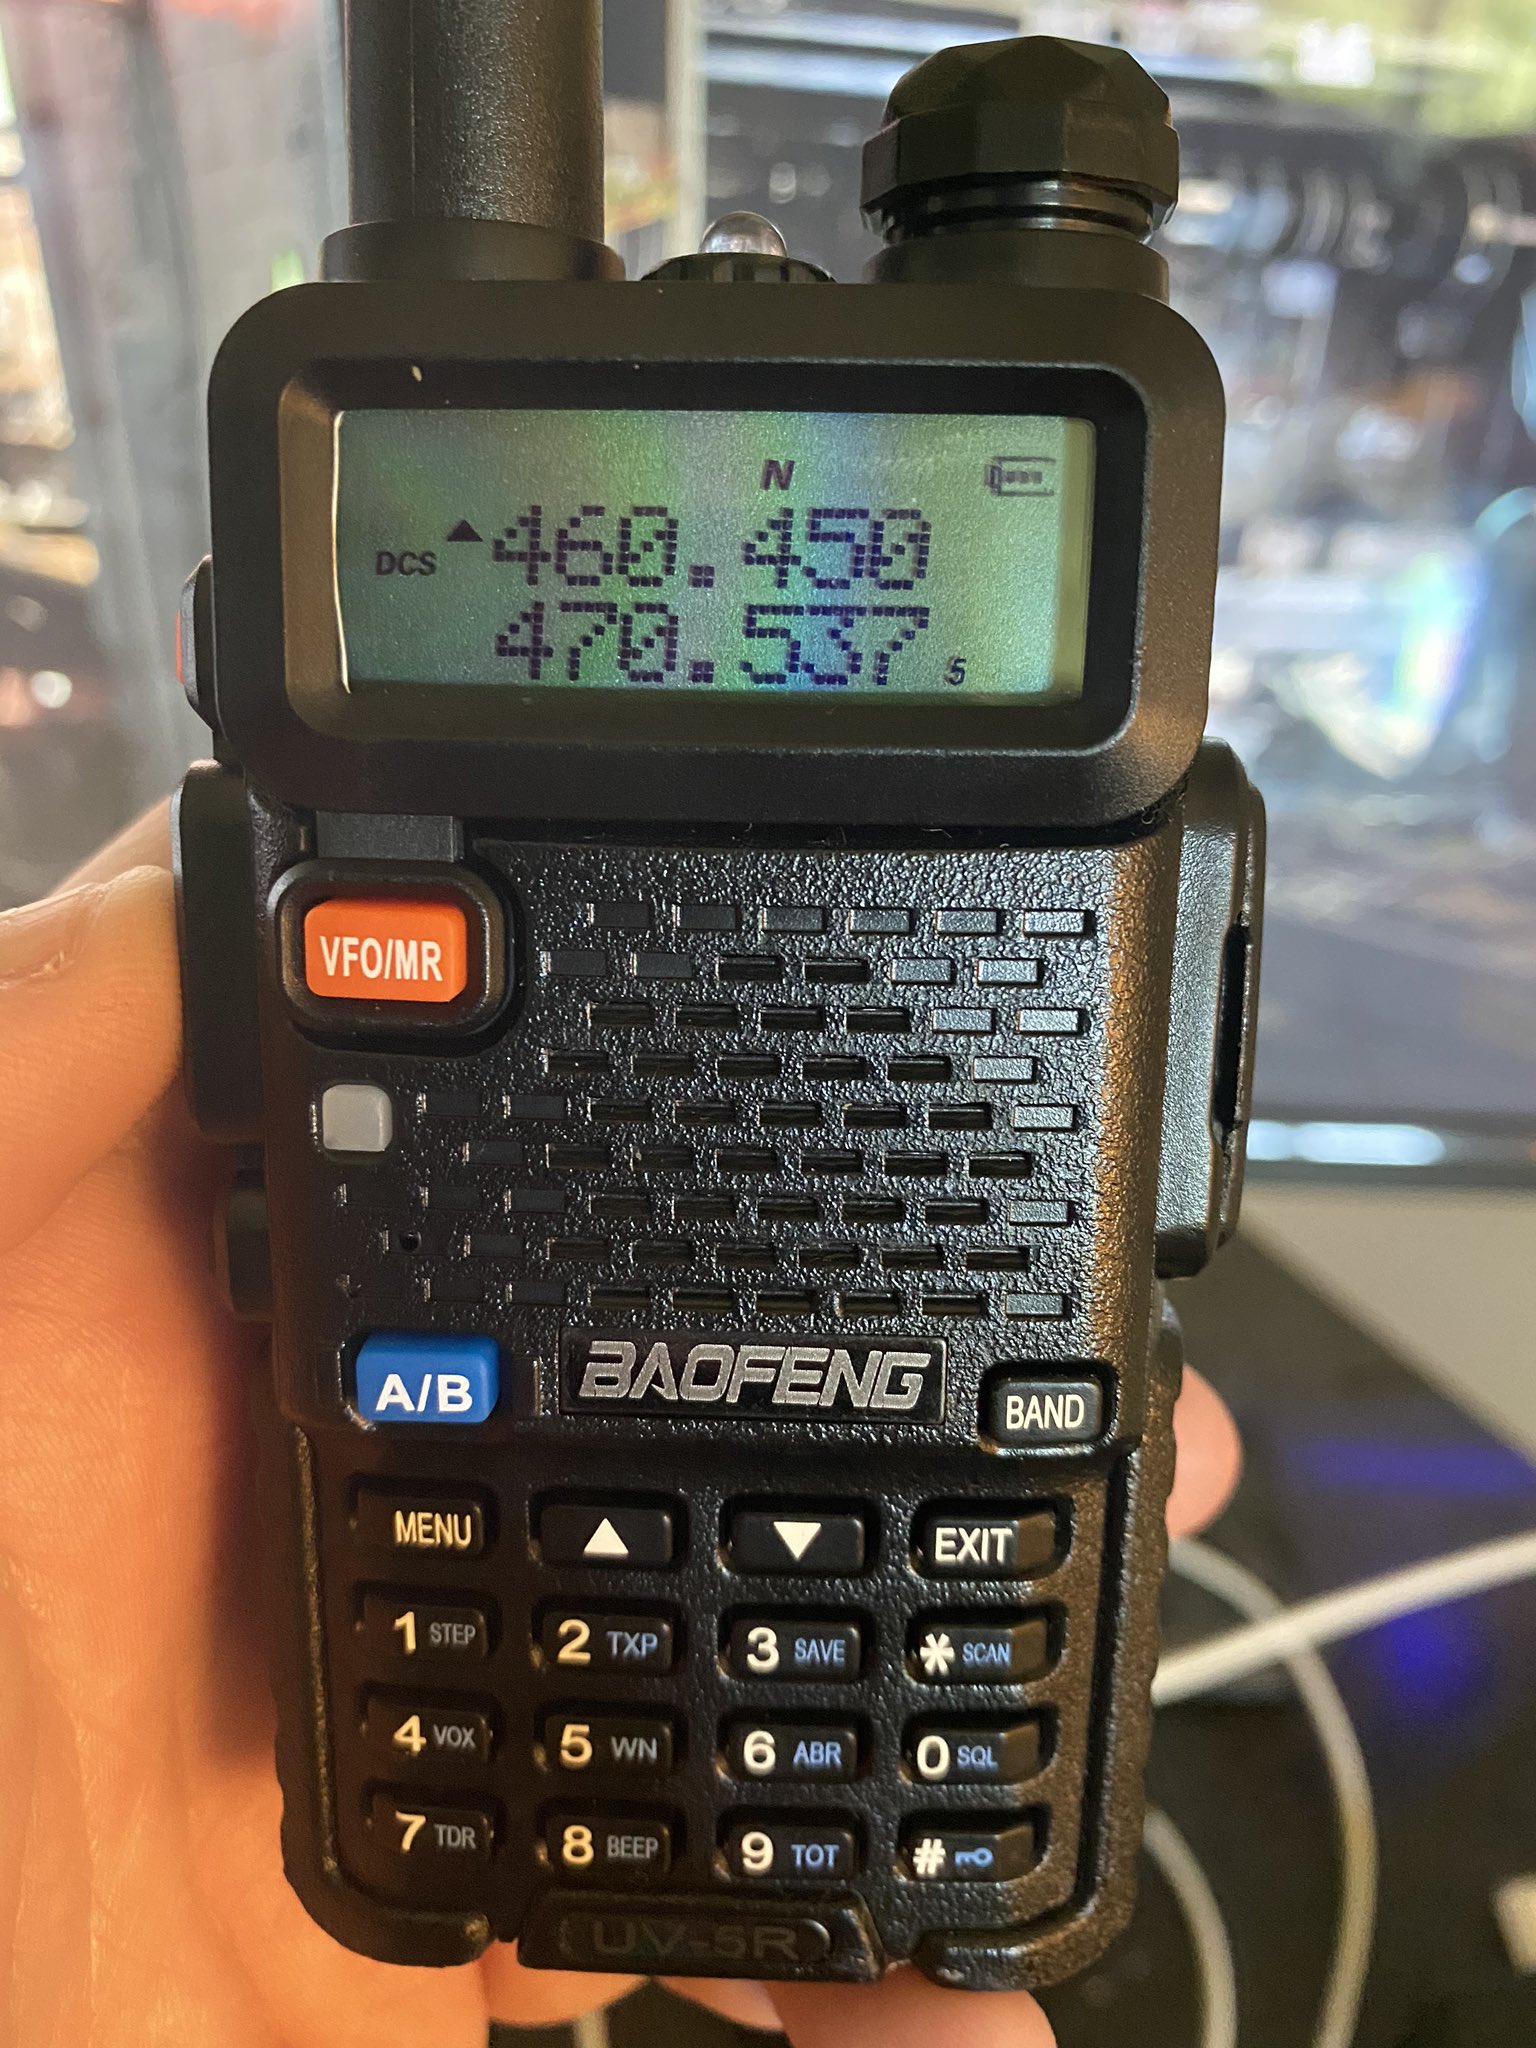
And now you should be able to hear broadcasts! If you’re in a busy area you may need to set the RX Tone to hear the right department. DCS is #10 and CTCS is #11. Use the arrow keys to get to the menu option, hit menu and set the tone. Menu again to set it.
Then exit to get back to the input page. You can then press the A/B button to input another frequency. If there is a trailing 5 in the frequency don’t worry the radio will set it. If you want to hear both A and B at the same time set TDR (menu #7) to ON.
Now’s a great time to mention that the manual you get with the radio is…not great. Thankfully a better manual has been made which can be found here and there a variety of cheat sheets on the web as well.
So manually inputting channels is great if you can look them up every single time and spend the time typing them in and going through the menus. Enter CHIRP which is (free) software for programming radios. It supports a huge amount of radios and can be found here.
You will need a programming cable in order to work with the software so make sure you buy a kit with one if you are getting a new radio. If not you can get one online for pretty cheap.
The full ins and outs of CHIRP is more than I can put in a tweet but the tl;dr is that you want to “download” your radio image first, save a copy, then make changes and “upload” it back to the radio. Make sure you save the modified image as well. Thankfully someone made a pretty easy guide to all of this, that can be found here.
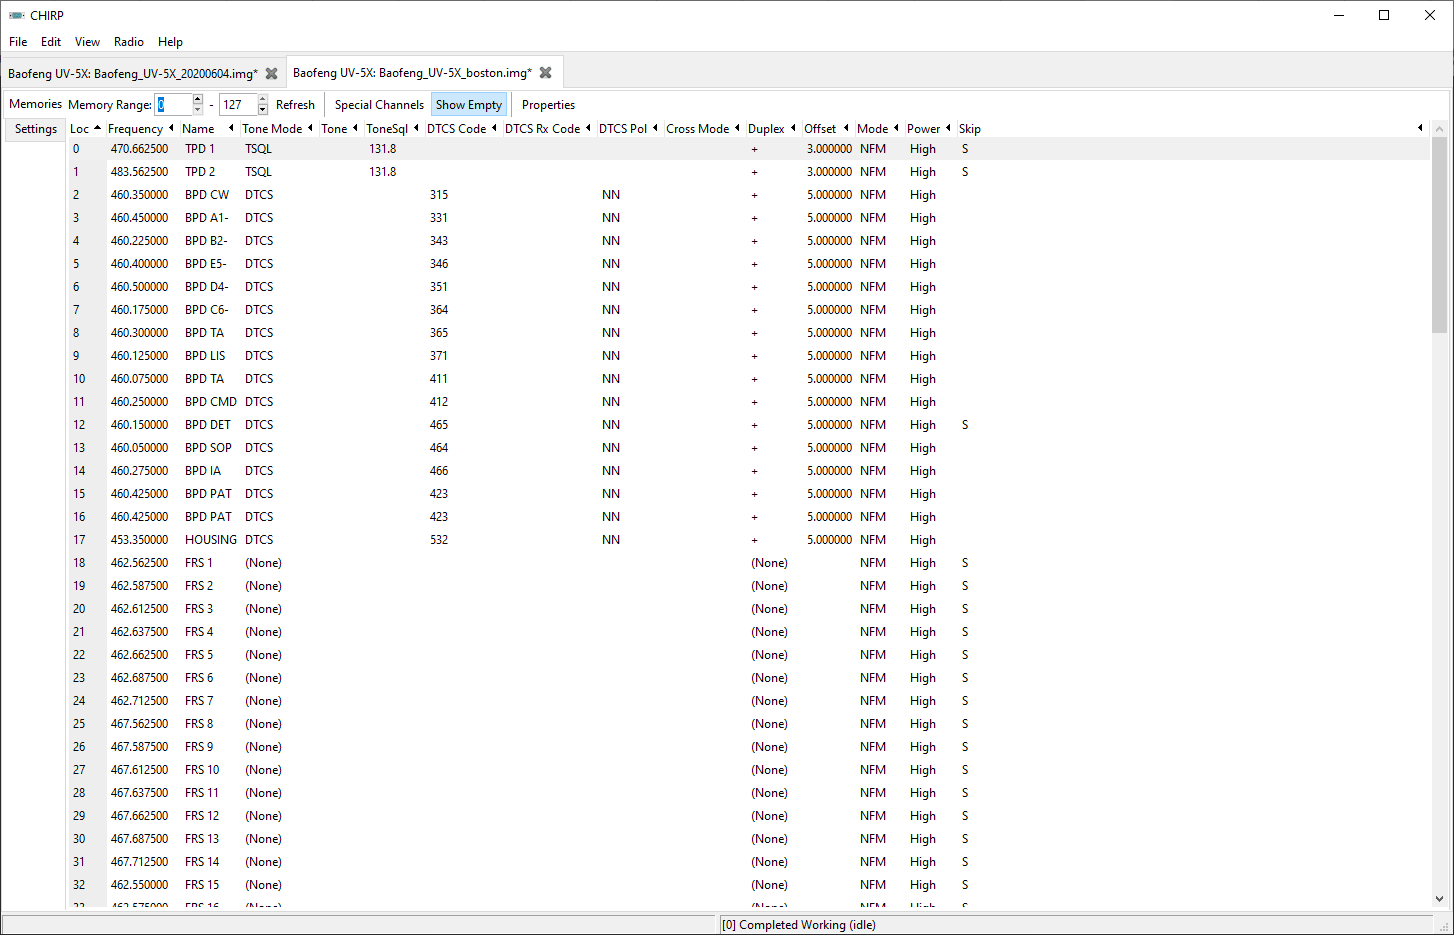
So you have CHIRP downloaded and your radio image ready to modify. Now what? Now you get to wipe the built in frequencies (see below) and add your own! Select all, right click, delete then pull up Radio Reference and get ready to copy and paste a bunch of stuff!

Using A-1/A-7 as an example I’ll give a quick demo of adding a frequency manually. First make sure Show Empty is set. Select the first one and click into each field and start inputting data from RR. It should look something like this:

If that looks like a pain in the ass (it is) then click Properties and it’ll be much easier to input data. If your tone mode is DTCS you can skip Tone and ToneSql. If your tone mode is PL then it’s vice versa. Here’s an example of BPD A-1.
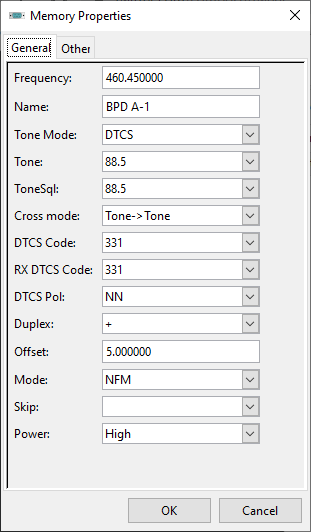
Also the name field is limited to six characters so you’ll need to get creative. In regards to the Duplex field. If you see RM in Radio Reference it’s duplex +, if you see M it’s likely simplex. Some good wiki explainers here and here. I would highly recommend setting this to OFF so you don’t accidentally transmit.
Regarding the Offset field. Good news, there’s a standard for this. Look up the value for the range the frequency you’re inputting is in. The RR Wiki entry is here.
Finally: Skip. This is if you want to skip the frequency while in scan mode. I personally have the FRS frequencies skipped since the range on them is terrible. I also skipped the MBTA Transit Police because sometimes they can be transmitting from rather far away (or underground) since they cover the entire transit system including Commuter Rail.
By the end of it you should have something like this. Now let’s get some Settings set and we’ll be good to upload.
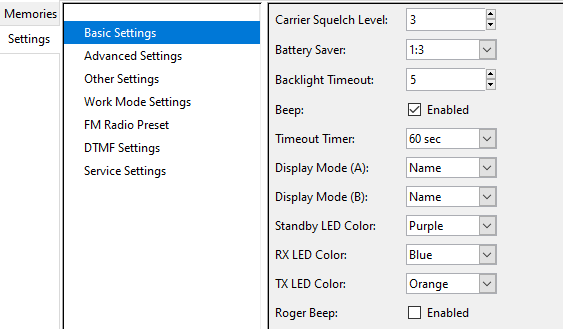
First are some quality of life changes. Squelch suppresses shitty transmissions so you’ll likely need to tweak it a bit but mine is currently set to 5 and works pretty well. Second is display mode: set these both to Name so you’ll see the name you set instead of the frequency.
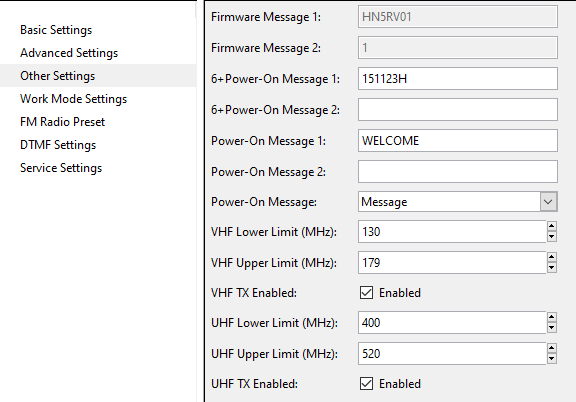
Next is Other Settings. I haven’t tested these myself but if you are not planning on using the FRS channels to talk to other FRS walkie talkies then I would recommend unchecking VHF TX and UHF TX so you don’t accidentally transmit on a frequency you’re not supposed to.
Finally save your img file, plug in your radio and upload it. Then press VFO/MR on the radio and you’ll be on the favorites list with A and B. You can start scanning by holding down *.
I have A for scanning and B for FRS. You can change frequencies by using the up and down buttons. Sometimes scanning can be a little flaky so if you haven’t heard a transmission in a while or the voices aren’t changing double check it’s scanning and set it back.
If you have a Radio Reference Premium subscription you can import directly from RR in CHIRP. You may have to futz with the zipcode to get what you need though but it will save you a ton of time.
If you have or are getting one of these radios (or another one supported by CHIRP) and want CSVs of frequencies or image files shoot me a message on Twitter with what you want to monitor and I will build it and send it to you. You can also email me: ethan AT farewell-ladmin DOT com.
If you’re in the Boston area, have a UV-5R or a CHIPS compatible radio here’s a link to the CSV and img file that my radio is programmed with. The img file is UV-5R specific. This includes all of BPD and MBTA PD.
And that’s an (extremely quick) rundown of using the UV-5R as a low cost scanner. Assuming your area meets certain criteria. If it doesn’t then you’ll either need to explore SDR or pick up a dedicated scanner. A good resource for finding a scanner that works in your area can be found here.
I personally use Uniden scanners which work pretty well. You can also explore SDR options! If you go the dedicated scanner route and live in the Boston Metro Area and want some pre-built favorites lists let me know. I’ve been tweaking mine for years.
Also expect a follow up post (eventually) about how to set up one of these on the FRS frequencies which you can transmit on. UPDATE: This is technically illegal per FCC regulations.